
- Adults
- Teenagers
- 60 min
What you need:
Pitt Artist Pen Fineliner in black, Grip pencil

Basic shapes
Basic shapes are a good way to learn to sketch figures. Grip pencil firmly. Use the motion of your entire arm to draw a series of circles. Use your shoulder instead of the wrist to swing the pencil around the page. Using the same technique, draw a large figure eight. Repeat.
Warm up by sketching these shapes:
Square (1)Circle (2)
Rectangle (3)
Triangle (4)
Cylinder (5)
Helpful hint
Helpful Hint Practice drawing all kinds of lines: straight lines, curved lines, and lines of different lengths and thicknesses. Developing a steady, smooth line makes your completed drawings look polished.
Drawing the head
Do your sketching in pencil. When you are satisfied with the drawing, use the India ink PITT artist pen S and then erase the pencil lines.
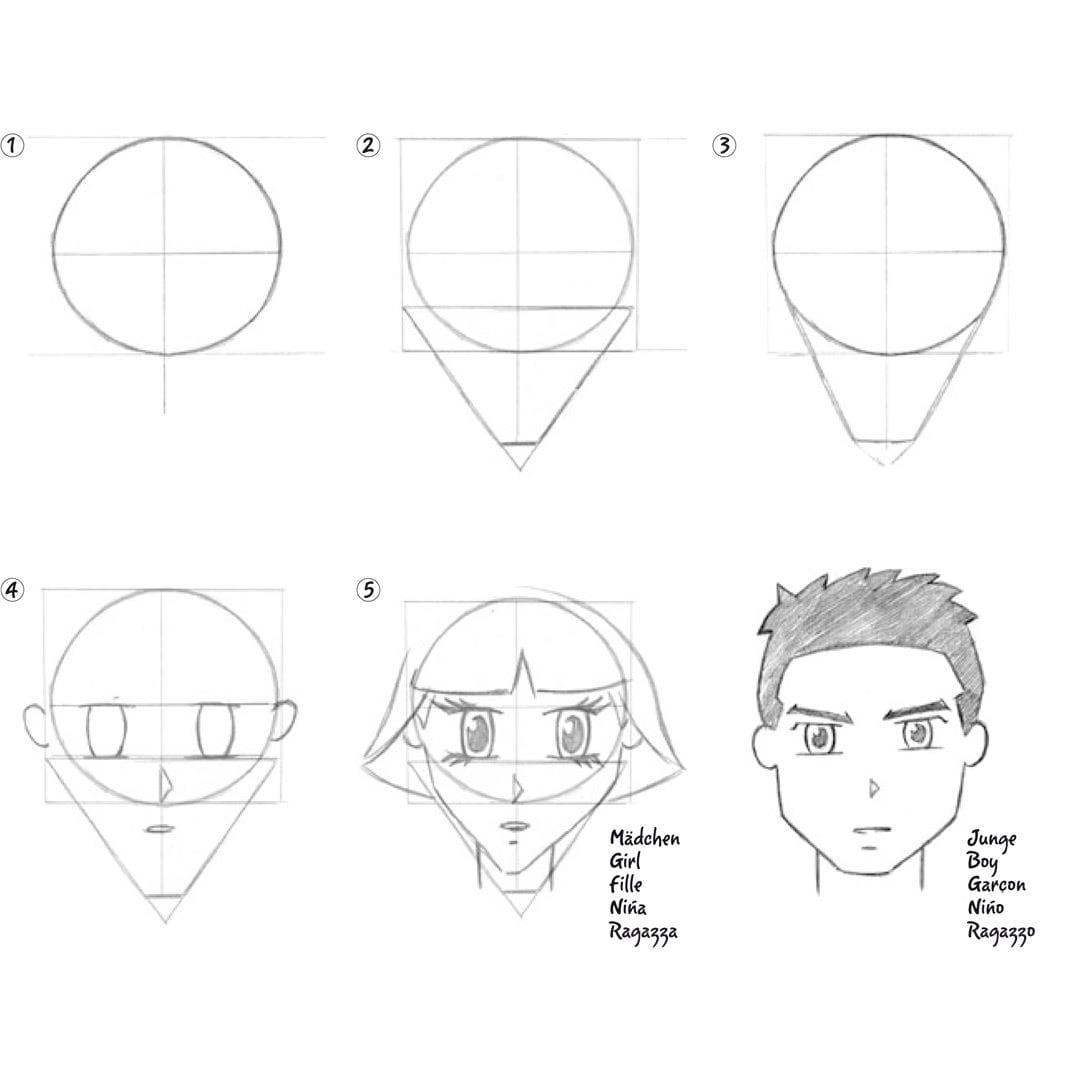
1. Draw a circle and split it into four even sections with a horizontal and vertical line.
2. Draw a light square around the circle. This will help in placement of additional shapes needed to form the head. In the lower half of the circle, draw a triangle, that points downward. Erase the bottom tip of the triangle to create a chin.
3. Draw angled vertical lines to connect the chin to the circle and create the edges of cheeks.
4. The eyes should be drawn from the center line of circle down to the top of the triangle. Draw small ovals on the outer edges of the circle for ears. Position the nose on the center line where the circle and the triangle intersect. Center the mouth in the triangle.
5. Create the neck by drawing two vertical lines downward from the triangle. The neck can be thick or thin depending on the character you are drawing. Make the neck fairly thin for a girl, thicker for a boy and as wide as the jaw for a goon.
Creating Emotions
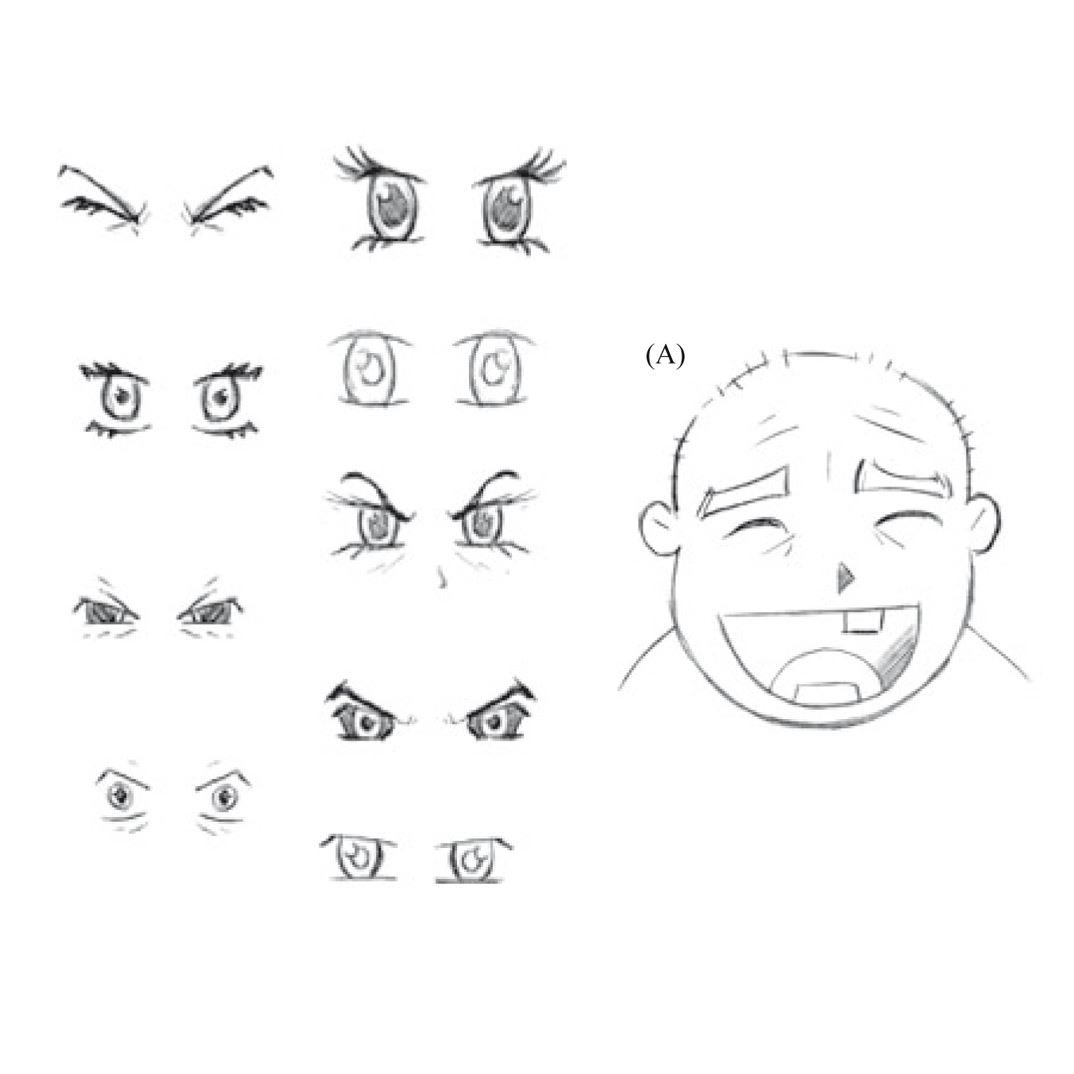
Create expression by using different shapes for eyes and adding eyelashes and eyebrows. Eyebrows pointing downward show anger. Eyebrows pointing upward express curiosity or worry. Female characters normally have thin eyebrows, while male brows are thicker. Younger characters have very large eyes and no eyelashes. The mouth and nose are always very small.
Happy/Laughing: Draw a half circle for an open happy mouth. Eyebrows curve upwards, and closed eyes are two arcs. (A)
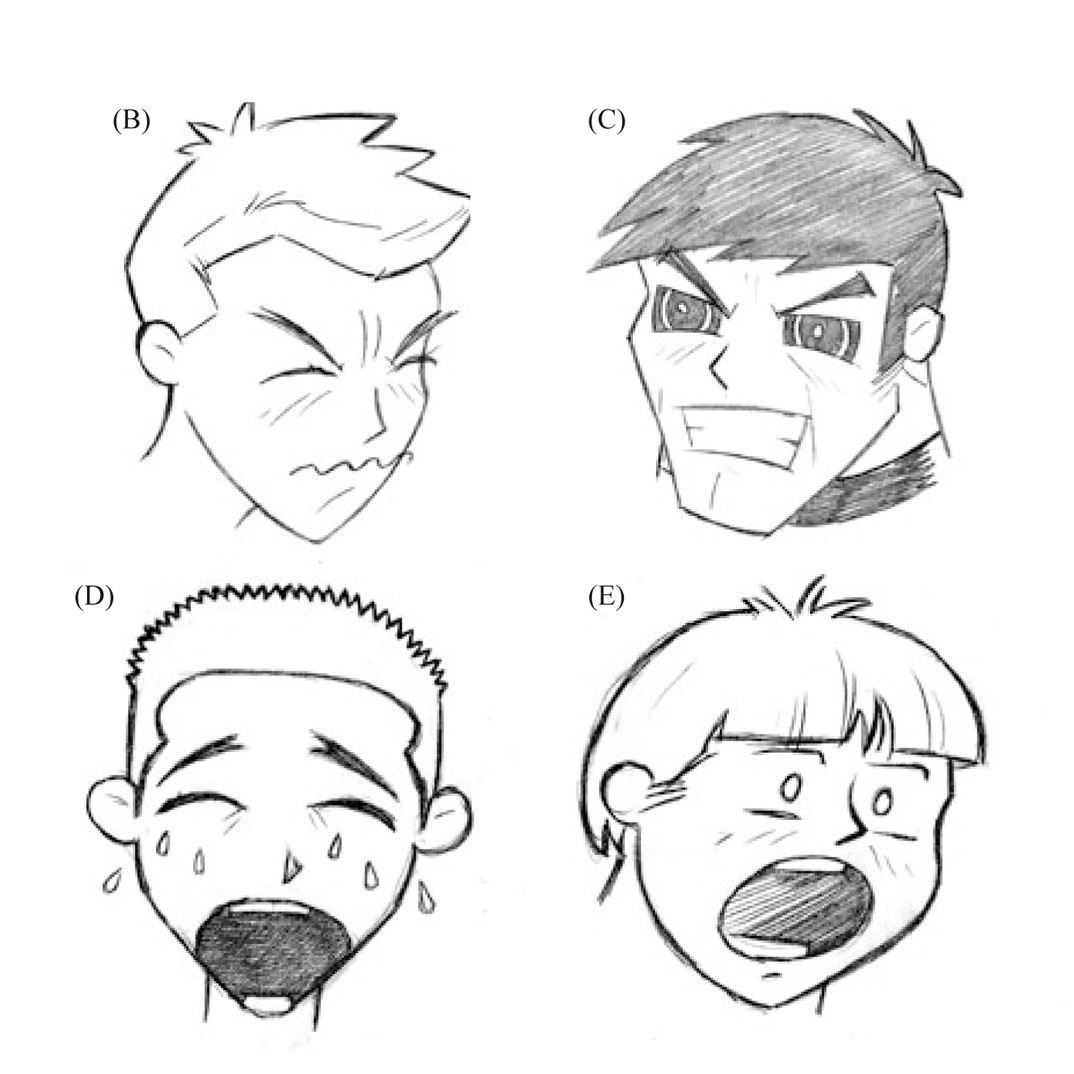
Frustrated: Draw two small arcs for closed eyes, slant eyebrows down in a V shape and add a squiggle for a mouth. (B)
Angry: Slant thick eyebrows down in a V shape. Draw a rectangle for a mouth and a horizontal line across to show partially clenched teeth. (C)
Sad/Crying: Draw eyebrows slanted upward to show worry. Draw the eyes as two small arcs and add tears. (D)
Frightened: Draw eyes wide open and a large circle for a gasping mouth. (E)

Drawing the body
The Torso
A body can be created using a series of triangles, cylinders, tapered cylinders and ovals. Begin with two triangles overlapping at the pointed ends. Sketch a third triangle pointing downward resting at the point of the top triangle. It should be approximately half the size of the first two triangles. Together these three triangles are the basis for the torso and hips. (A) For male figures, use wider and heavier shapes. Men have wide shoulders and narrow hips (B), while women have narrow shoulders and wider hips.

Drawing Hands
The palm, or base of the hand, can be drawn with a trapezoid. Add tapered cylinders to create fingers and a thumb.
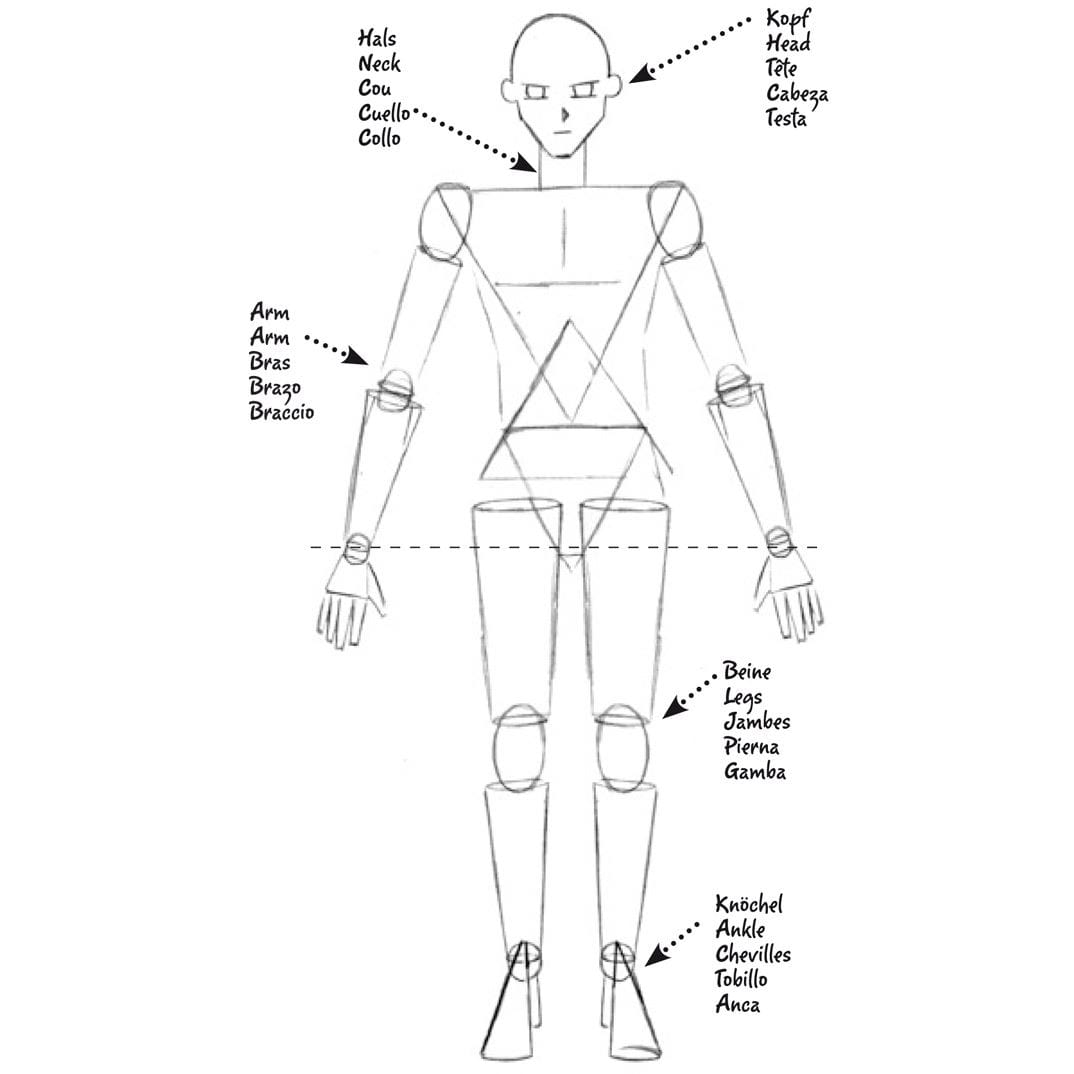
The neck and head
Draw a small cylinder for the neck and then add the head.
Arms
Draw an oval at each corner of the top triangle for the shoulders. Add arms by drawing two tapered cylinders, one below the other. Leave a gap between and draw an oval to represent the elbow. The wrist should end at the bottom tip of the lowest triangle. Add a small oval at the bottom of the arm for a wrist. Add the Hand.
Legs and feet
The legs are shaped with tapered cylinders and an oval for the knee. (The knee should overlap the top cylinder.) Draw a small oval for the ankle and a triangle for the foot.

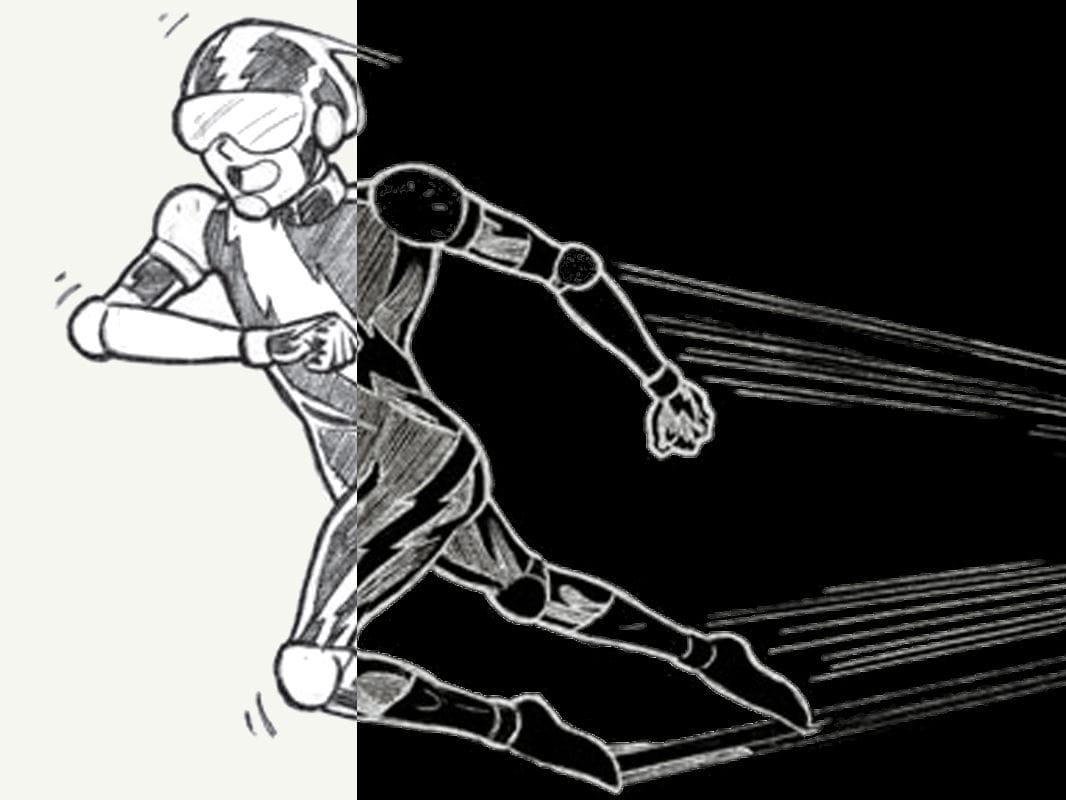
Bodies in motion
The body is an agile system. It has no natural rigid position. These drawings are examples of bodies in motion. In these sketches, notice some of the underlying shapes are still visible and show how they relate to each other when moving. Shorter lines indicate smaller range of motion. (A) Show impact by short lines radiating from point of contact. (B) Wrap lines around the body to indicate that a character is twisting. (C)

Helpful Hint
Use a stencil to create motion lines to show movement, momentum, speed, direction, excitement, and energy. Use radiating straight lines behind a character to show the action of a person running. Use the curved lines of the stencil to show the action of a swinging motion.
The general principals of light and shadow shown with simple shapes on the previous page apply to forms the of human body. When the light source is close to an object the shadows made are dark and harsh. When the light source is further away, the shadows are lighter and softer.
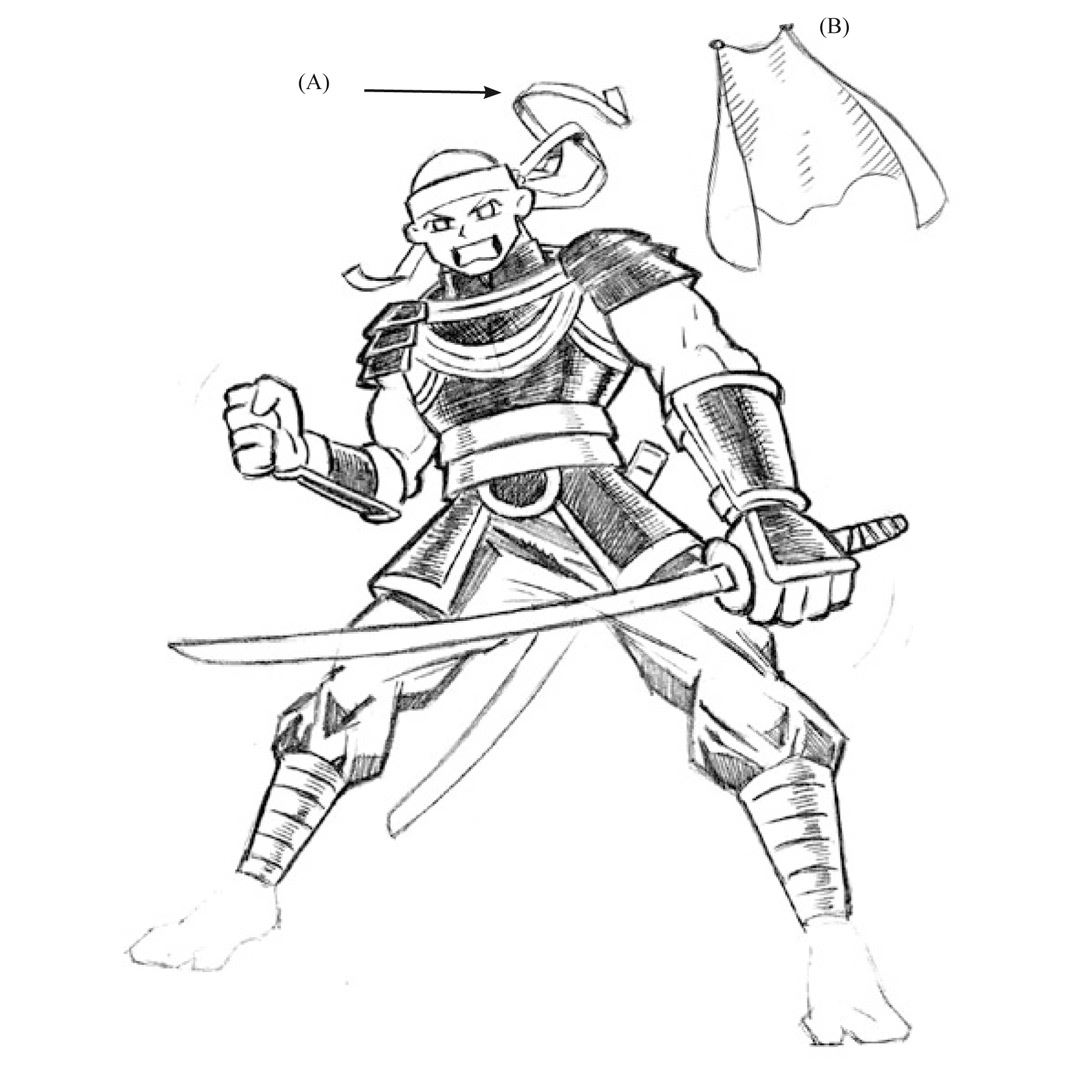
Clothing
Clothing and accessories with tiny details like bows, capes, jewelry and swords personalize and define the character. Flapping clothes or flowing hair help show movement. (A) Notice how the ribbons on this warrior’s headdress give the illusion that he just moved. (B)

Light and shadow
Light and shadow give objects dimension. When light hits an object it creates highlights and shadow. Choose a location for a light source. Draw light lines from this location to the outer edges of an object. The surface opposite the light source will be in shadow.